A fence layout is essential for receiving an accurate quote. Follow the step-by-step guide to create a layout drawing that captures all the information our experts need for your quote.
Step-by-Step Guide
How to Create Your Layout
Follow these six steps to create a comprehensive fence layout that will help us provide you with an accurate quote.
1
Identify Your Property Boundaries
Start by identifying the exact boundaries where you want to install fencing. Consider property lines, easements, and setback requirements.
Review your property survey if available
Mark boundary corners with flags or stakes
Note any shared fence lines with neighbors
Pro Tip: Check with your local zoning office for setback requirements from property lines.
2
Sketch Your Property
Draw a rough outline of the area you want to fence. Include property boundaries, buildings, trees, and any obstacles.
Draw buildings, barns, and outbuildings
Mark existing trees and landscaping
Include driveways and pathways
Pro Tip: Use graph paper or Google Earth for more accurate proportions.
3
Mark Gate Locations
Indicate the location and size of gates for vehicle access, pedestrian access, and horse movement between paddocks.
Walk-through gates: 4′ wide minimum
Single vehicle gates: 12′ wide
Equipment/trailer gates: 14-16′ wide
Pro Tip: Standard gate widths: 4′ for walk-through, 12-16′ for equipment.
4
Measure & Note Distances
Walk your fence line and measure the distance of each straight run. Note the total linear footage/meterage.
Measure each straight section individually
Calculate total linear feet
Note post spacing (typically 10-12 feet)
Pro Tip: Use a measuring wheel for longer distances.
5
Add Special Notes
Mark terrain changes, rocky areas, water crossings, or any areas that may require special consideration.
Hills and grade changes
Rocky or sandy soil conditions
Streams, ditches, or wet areas
Pro Tip: If you include and special notes, make sure to write legibly.
6
Upload Your Layout
Once complete, scan or photograph your layout and upload it along with any reference photos of your property.
Review the “Layout Checklist” below
Scan or photograph your completed layout
Submit via the quote request form
Pro Tip: Save your file as a PDF or high-quality image for best results.
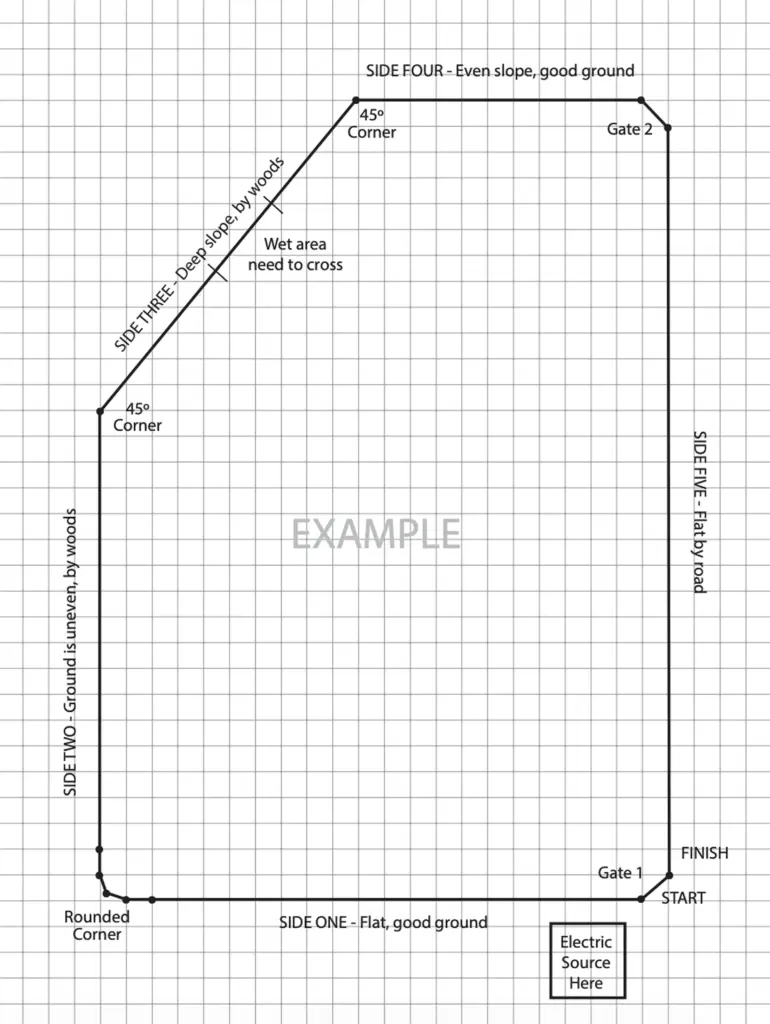
Example Fence Layout
Here’s an example of a well-prepared fence layout drawing. Use this as a reference when creating your own property sketch.
Layout Checklist
Make sure your layout includes all of these details for the most accurate quote:
Lengths of each fence line
Total linear feet/meters of fencing needed
Number and width of gates required
Corner and end post locations
Any areas with significant grade changes
Soil type (rocky, sandy, clay, etc.)
Possible obstacles
Existing fence lines to connect to
Upload Your Layout
Use our templates to create a professional fence layout or view an example.